Window Restoration
- Repair sash - rebuild entirely from parts, or replace missing or broken muntins. Glue, clamp, repeg, fill gaps with Bondo or epoxy putty. (Because the windows in the body of the classrooms were 'double double hung' for insulation, there were spare parts available for these windows. Those windows in the unheated stairwell, cloakrooms and attic were not double, some were replacement windows over the history of the schoolhouse, and spare parts for these were not available except as could be sawed down from the extra broken classroom windows. The wood and construction quality of the original windows was much better than that of any replacement windows, despite being much older.)
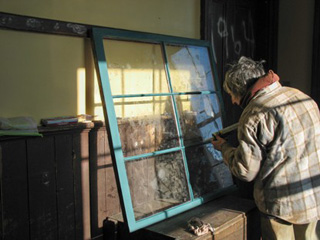
- Sand off old paint as much as possible, trying not to damage the planed details. (The original 1885 muntins were narrow and delicate in appearance; replacement windows were more clunky.)
- Chip out broken or crumbling putty and remove broken glass as necessary. (Besides 125 years, there had been much recent vandalism. In the attic had been found buckets of stones for 'fort fights'.) The original 1885 putty was very tough and sometimes had to be blow torched by Kathy at Mobile Glass before it could be removed. Replacement putty over the years could generally be picked out, as the quality of putty greatly deteriorated over the history of the schoolhouse.
- Replace broken or missing glass, lubricating the glass bed with linseed oil for adhesion. We used 'Dap 33 Glazing', allowing to dry for at least 2 weeks. The glass shelf was so narrow on these delicate muntins that any replacement panes had to be cut very precisely. Also, the wood had to be nibbled before inserting the modern glasiers points as these were bigger than the dainty original triangles and would have protruded unattractively.
- Build up punk wood with Penetrol and/or linseed oil.
- Primer coat was Benjamin Moore Penetrating alkyd primer, tinted green (exterior) or red. (interior)
- Caulk the interior line between the irregular sash wood and glass to fill the gap (in order to allow paint to be neatly applied down to the glass edge), and on the exterior side, caulk any fine cracks in the putty and at the putty edge to prevent moisture from sneaking underneath. Caulk also any wood seams, holes or gouges and rough surface irregularities.
- 2 coats latex paint - BM MoorGlo 'Park Green' for the exterior side, BM semi-gloss 'Onendaga Clay' for the interior. (These were dead matches of the original colors.) Caulk as needed between layers.
- After long drying, cut off excess paint and caulk with utility knife and razor, then clean.
- Hang in predetermined window frames and size. (Because the sills slope down, the storm windows were approximately 3/8-1/2 inch longer than the inner windows. However, the inner windows were generally in better condition, having been more weather protected; these were preferentially selected to repair and rehang. Additionally, the outer windows were pieced horizontally across the middle, being surely a less expensive though less attractive construction than the solid 6 pane sash of the inner windows; so we tried preferentially to find the better quality inner windows to repair. However, these inner windows, placed into the outer position, had to be built up along the upper rail with a wood strip of the proper thickness to make up the height difference, then sanded and repainted along this line. After all this work - approximately 15 hours /sash, 52 sash altogether - rehanging was often discouraging instead of triumphant, as in about half the windows, either the sash or the frame was warped and complex shaving was necessary before a good fit)
- The window frames had been previously taken apart. The weights were generally found snarled together at the bottom of the frame box. These were pulled out, the better weights were chosen and attached to size 10 cotton clothesline rope into the outer (sanded and oiled) pulley system, then the frame boxed in again. The window frame was repaired as needed and the exterior jamb painted in 3 coats - to prevent the possibility of painting the windows shut if painted after the windows were rehung.
- All latches had been previously removed, stripped, derusted as much as possible (they were all iron), and treated with Penetrol. These were matched and rescrewed onto the windows, using the same style of latches within individual rooms. (There were multiple patterns of latches throughout the building - as though they had made a collection of leftover latches from various donations.)
- Comments: The 'double double hung' window system in the classrooms would have allowed these rooms to retain heat despite the generous window proportions. The cloakrooms and stairwell were considered unimportant to heat. In the classrooms, there is a 4 inch gap of air insulation between the inner and outer window sash. When functioning properly, these very large and heavy windows open and close with fingertip pressure and balance beautifully. The lower floor windows are 8 inches longer than the upper windows, giving the building a taller, more stately appearance. Light pours into the classrooms with excellent illumination as would be important for a school, especially before electricity. The upper classroom was so bright that there were inner shutters - on the upper half of the south windows only - frugality combined with practicality. There is evidence on several of the window frames of wall sconce attachments for kerosene lamps. All the original window sash, interior and exterior, was apparently factory painted the rust red color which was retained as the interior finish. This appears to have been a stain rather than paint. The exterior of the windows had then been over-painted green before hanging. The east side (front) windows were later painted over in black - which became more fashionable in later Victorian years.